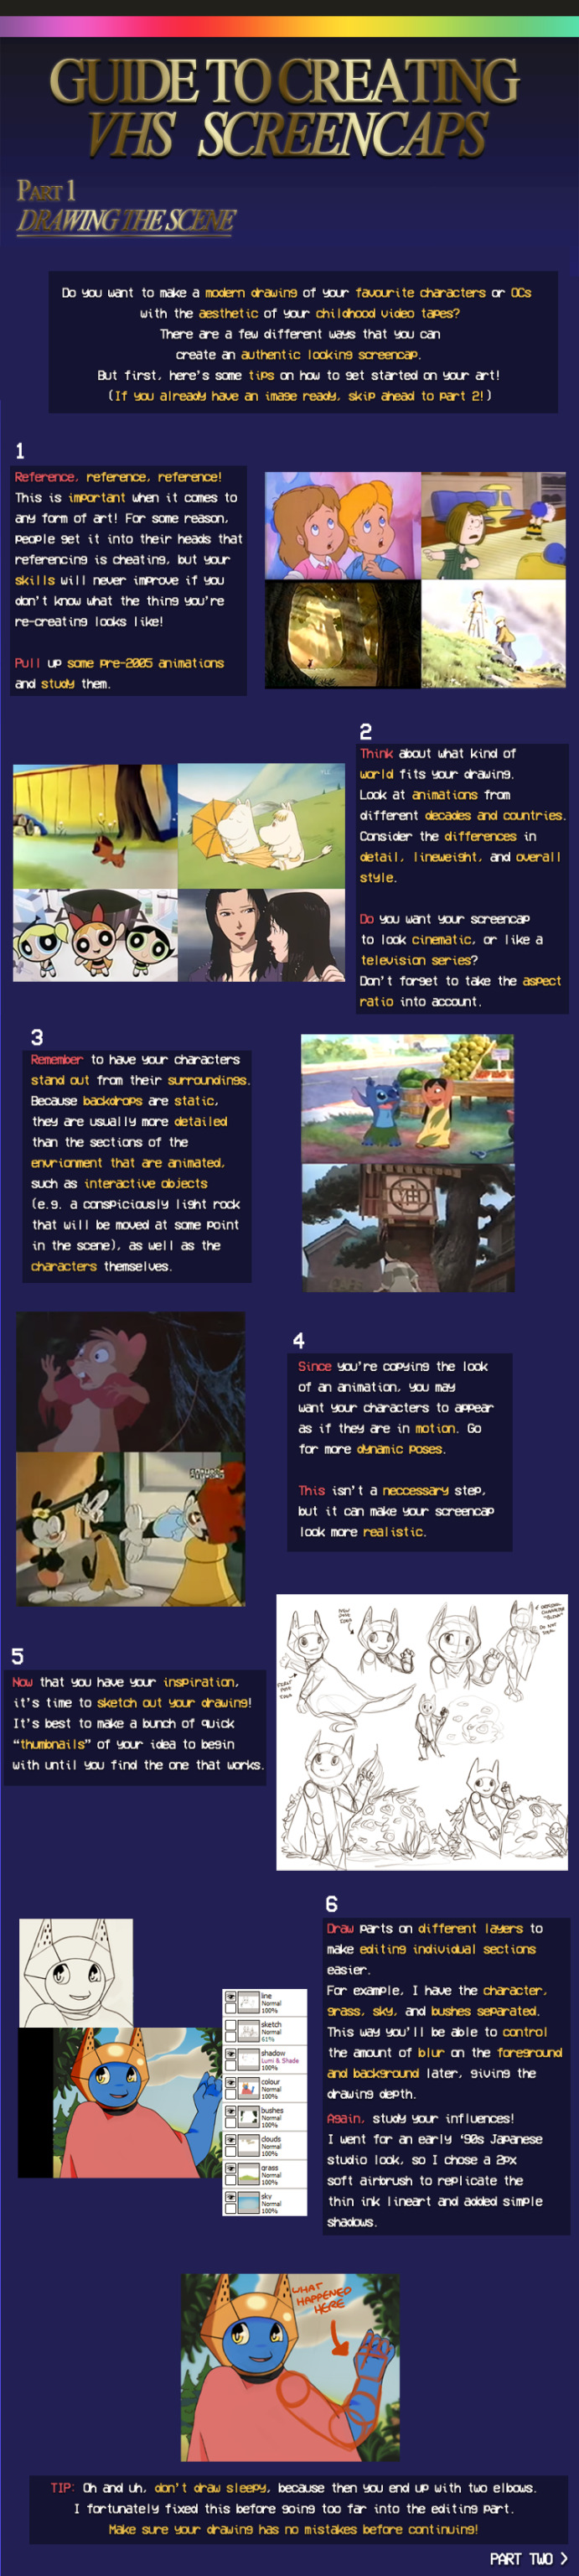
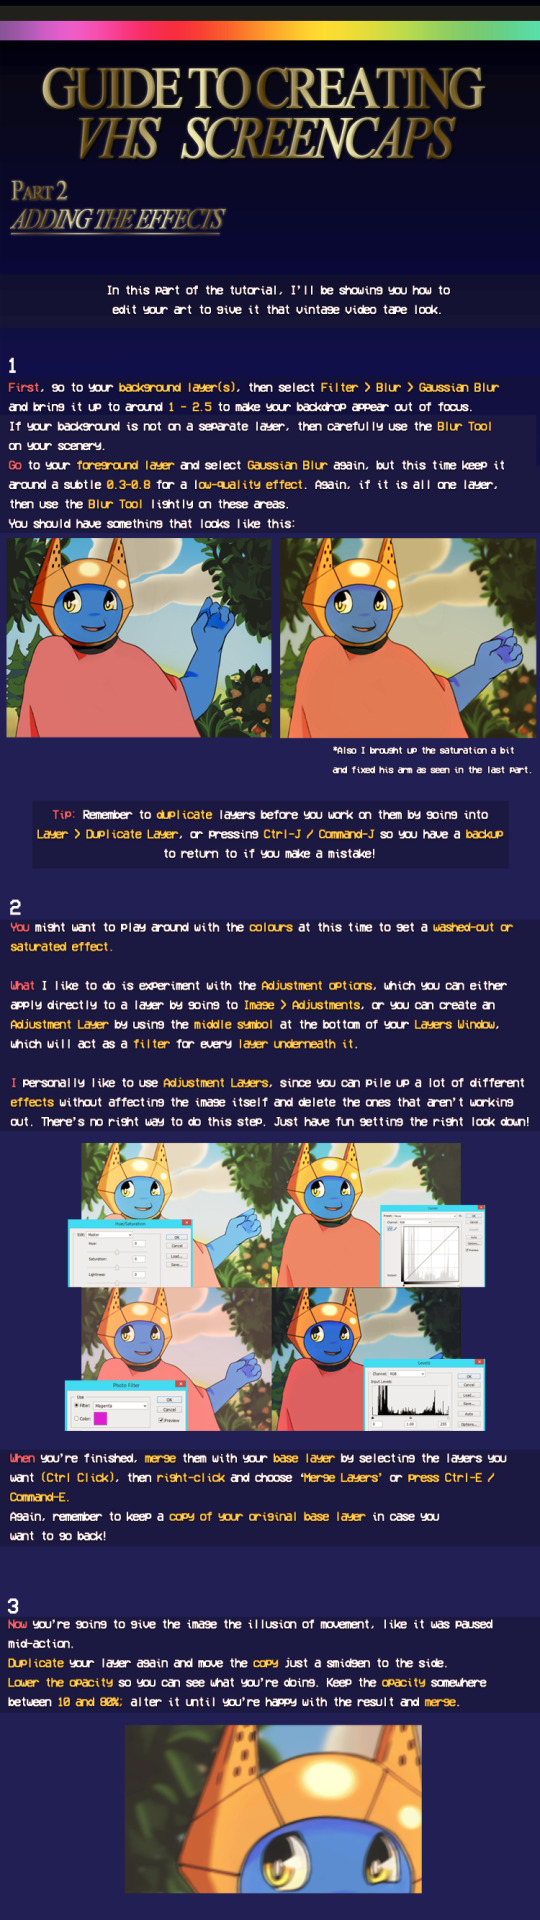
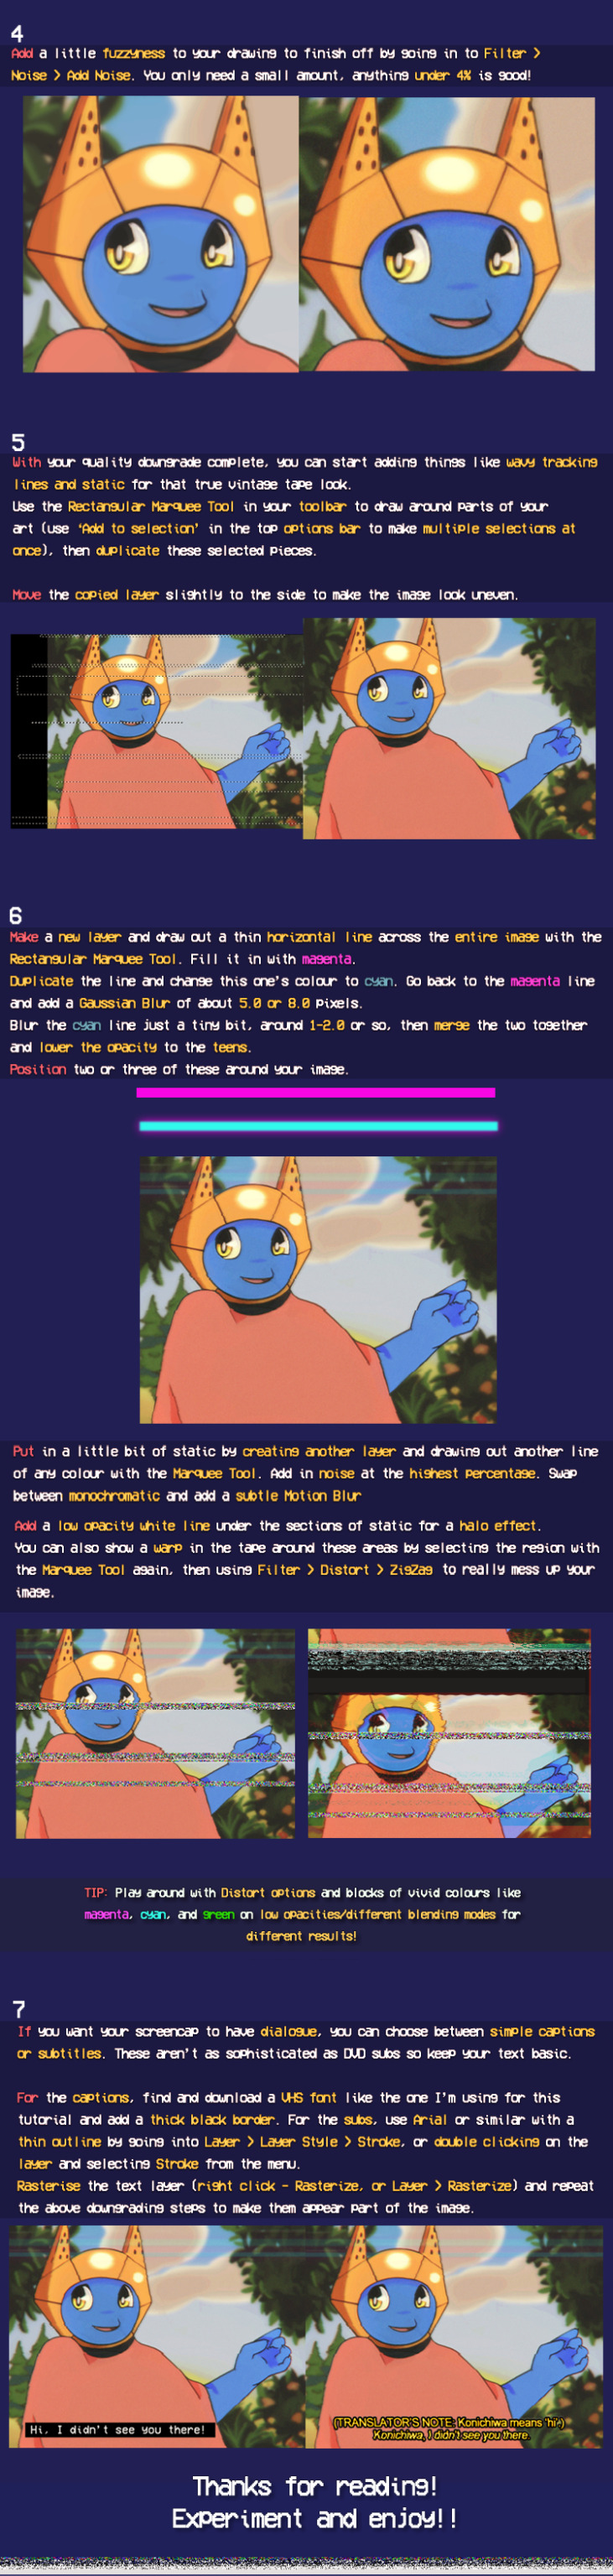
#Fake Screencap Tutorial
Explore tagged Tumblr posts
Visit Tumblr Blog
Explore Tumblr blogs with no restrictions, modern design and the best experience.
Last Seen Tumblr Blogs


Fun Fact
The most popular pages on Tumblr are about Minecraft, GIFs, and David J. Peterson.
Text
By Kea2lie on DeviantArt
#Tutorials & References#Art Tutorial#Fake Screenshot Tutorial#Fake Screencap Tutorial#VHS Tutorial#not my art#If the original artist wants me to take this down I will
132 notes
·
View notes
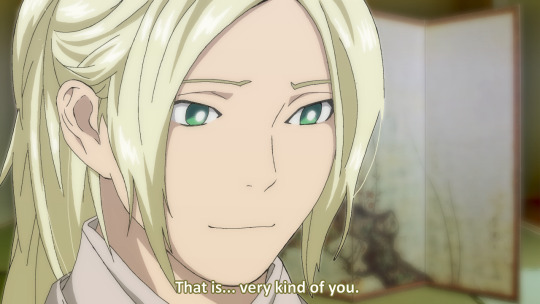
Text
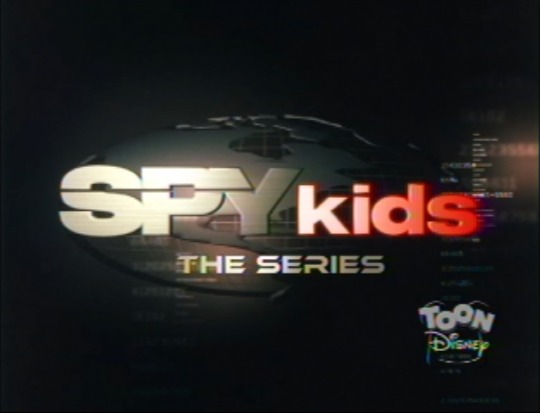
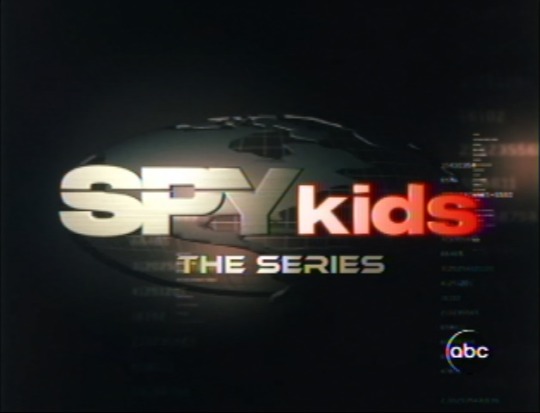
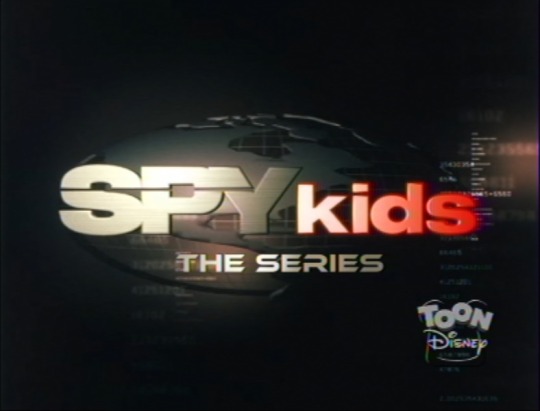
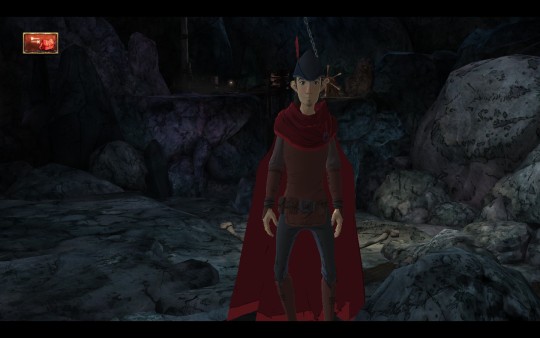
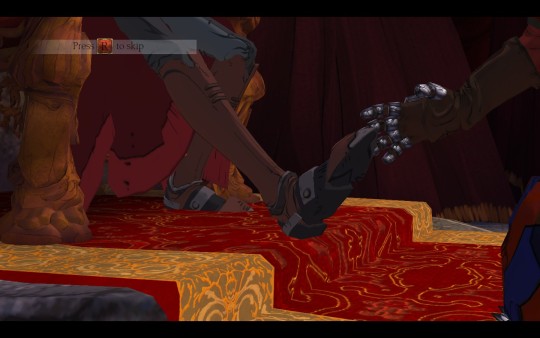
Hey, so, I was scrolling through the internet and found an old obscured Angelfire site that hasn't been updated since 2004, and on it I found this screencap of a... Spy Kids cartoon??? Apparently there was a Spy Kids cartoon that aired on ABC in the '00s, likely on the One Saturday Morning block. I have not heard of it at all until now. Thanks to whoever you are for recording this on VHS.
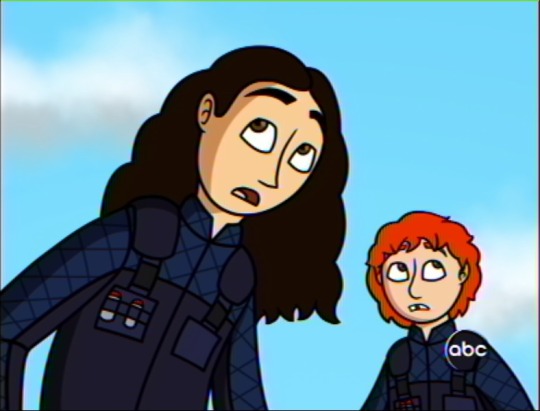
I did a bit more digging and apparently it aired on Toon Disney as well, as I found a smaller capture of a Toon Disney airing, this time on a Blogger site.
What is going on? What time did this cartoon air, and why haven't we heard much about it?
...
And scene. Had you fooled, didn't I? S:)
So you may have noticed that these screencaps are obviously fake. Hope they were convincing enough. I've been wanting to make fake screencaps of my Spy Kids cartoon pitch for a while now. This was not only an opportunity to test out simplified, possibly animation-friendly designs of the characters for the screencap, but also to play around with a very useful VHS effect and test out a cloud brush. I also used these fake screenshot and RGB split effect tutorials by @sassatello and @23i2ko which have been a big help in making a convincing enough screencap.
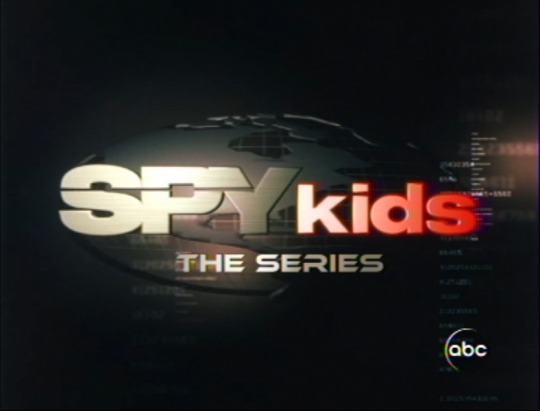
While I drew and coloured the first screencap, with a comic artstyle meant to emulate the likes of shows such as Ben 10 and TMNT '03, the second screencap is more of an edited capture of the Spy Kids title from the trailer, with a "the series" title at the bottom (using the Ethnocentric RG font used in many Spy Kids ads and merchandise), as if the intro was finishing up (the theme song is definitely gonna be Spy Kids Save the World by Fonda).
You can see the screencaps sans the VHS effect and screenbugs down below.

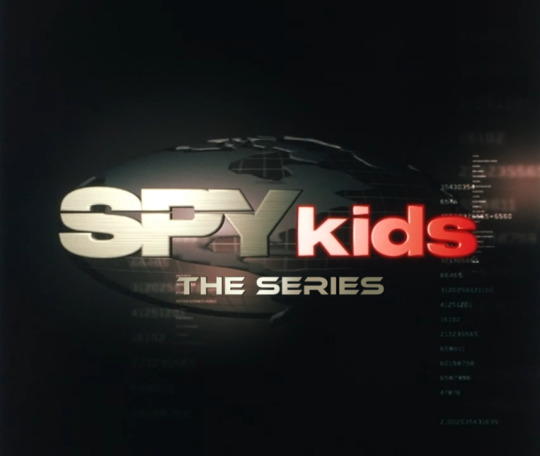
I also made more "captures" with different effects on different channels in different sizes, including "captures" of an ABC3 airing that I ended up not using, which you can also see below. The ABC, Toon Disney and ABC3 screenbugs are by RabbitFilmMaker, YourDailyDeviantArt and UnitedWorldMedia on Deviantart.


I have been thinking of ideas for more sets of fake screencaps, so let me know if you want me to "find" more screencaps. 😉
And let me know if you would've loved to have seen an earlier Spy Kids cartoon and what you think it would be like?
22 notes
·
View notes
Text

Last night I thought "What if Lawrie (from Brawl Stars) was in CMY2K???" just because I found 0046incognito's old tutorial on how to do a fake screencap art so I followed through.
The thing that matters is this was one of the first attempts at doing 2000s style (especially the lines!) and I had a BLAST doing this fabricated junk. Design was kinda hard, the original was mostly different but I had to bend the design rules for the sake of the "Halosoft's product made sometime in 1995, definitely bad and that was 4 years before Hibiki was even made" and the face was supposed to be those cream colored old desktop monitors.
Aside from this ugly ass design overall looks perfectly fine
Now I know how to make fakes CRT screencaps have a nice day everyone
16 notes
·
View notes
Text
DAMN THE END OF SEASON 1 HITS HARD...
( insp by @0046incognito 's fake screencap tutorial ty man it helped alot)
15 notes
·
View notes
Text


*the power to make fake retro anime screenshots once again falling into my hands*
#found a tutorial on how to do the retro anime filter in CSP and have been using it as necessary when I’m in a certain mood for drawing#I drew the Fem!Iggy one first and she’s based more on Sailor Moon#The Wedding Peach one came second and I forgot to do the color gradient step wow#I was going to draw something else but then my brain was like NO WEDDING PEACH NOW#my art#digital art#fan art#oc art#wedding peach#ffxv#ffxv ignis#fem! Ignis#genderbend#fake anime screencap#retro anime#retro anime aesthetic#fake anime screenshot#clip studio paint pro#clip studio paint#guess I don’t really need the color gradient since I don’t use pure blacks or pure whites anyway#That chibi Momoko really came to life when I started adding the filter on wow
52 notes
·
View notes
Photo

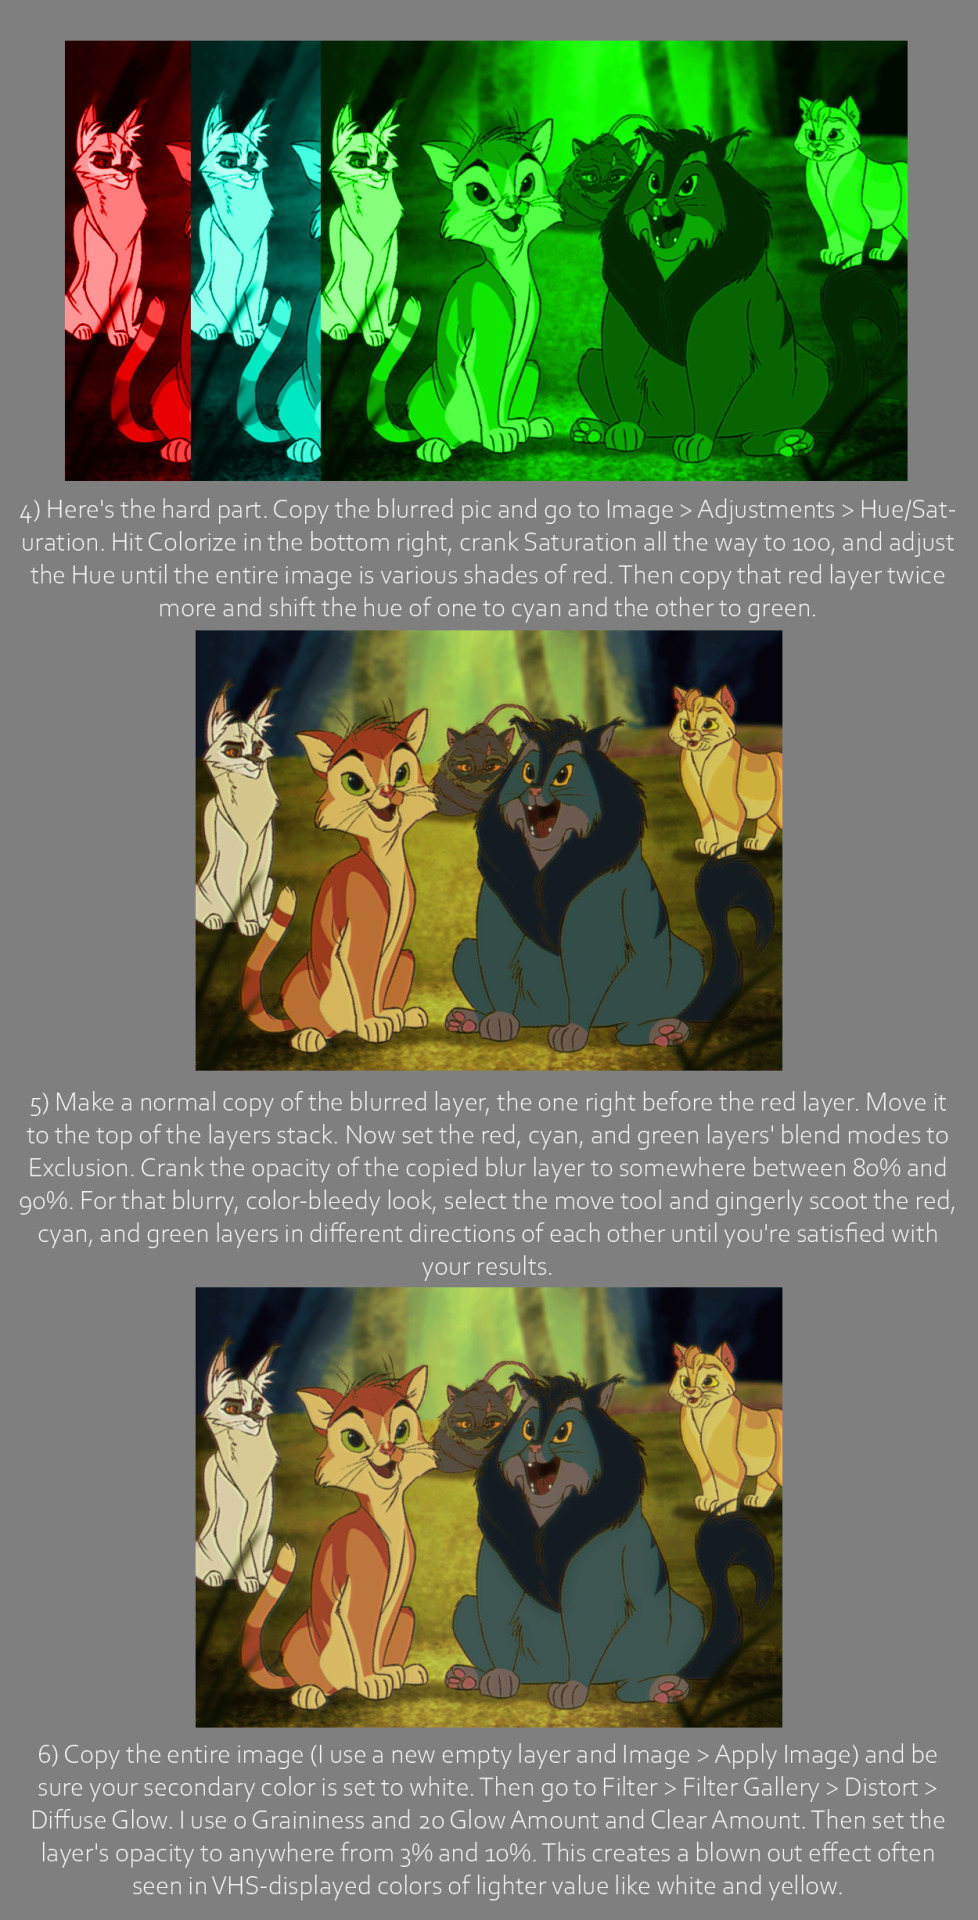


As promised, here’s the fake screenshot tutorial! This is a method I’ve been fussing with since December of last year, and as you can probably see there’s a lot of room for improvement and streamlining lol. But this is just the method I’m using and am still in the process of changing, so I encourage everyone to experiment with it and find what works best for them.
This was all done in Photoshop and requires basic knowledge of color adjusting, filters, and layer blending modes, but it’s mechanical and simple enough that it can likely be picked up easily or reverse engineered to work in another program like GiMP or Sai.
Hope this helps! Have fun, kids!
#warriors#warrior cats#art tutorial#tutorial#fake screenshot#fake screencap#erin hunter#warriors draws#long post#fanart
2K notes
·
View notes
Photo

I wrote up a tutorial on how to make fake V3 Screenshots! Link here, have fun!
#tutorial#meghans tutorials#resource#drv3 resource#fake drv3 screencap tutorial#it's also on my sidebar!
65 notes
·
View notes
Text

WORDS CANT HURT ME THESE SHADES ARE GUCCI-
Borrowed @tamakid 's tutorial after,, however long ots been uwo
#artists on tumblr#illustration#90's anime#i borrowed tamakid's tutorial lmao#fake anime screenshot#fake anime screencap#fake anime#originalcharacter#original character(s)#original character#original characters#original#my art#anime style#anime art#mangastyle#manga style#retro anime#ibis paint x#ibispaintx#sniiper doodles
20 notes
·
View notes
Photo

i tried out making an 80s anime screenshot!! // commission me!
#art#2018#oc: umeko nakahara#i couldn't find any tutorials on how to make them on sai so i had to bullshit it but i think it turned out ok!!#so if anybody wants help making one with sai just hmu i'll give you some tips#the bg is a sailor moon screencap btw!! i didn't draw it.#original character#oc#my oc#retro#retro anime#fake anime screenshot#80s
35 notes
·
View notes
Photo

Noragami season 3 confirmed ----
jk I just made some Kiun edits with a fake anime screencap tutorial. Kiun’s eyes look kind of green on the manga cover, but I made a bonus yellow eyes edit because I feel like the anime would probably go for it.
(Panel traced from the manga, also I didn’t make the background either, just edited it)
143 notes
·
View notes
Text
HOW TO DRAW WILD KRATTS ART STYLE
in the specific way that i've learned to do it
FEATURING A BOY IN MORTAL DANGER
SO! You want to know how to replicate the iconic lineless art style of Wild Kratts. Cool! There are a handful of people in the fandom who can do this, and as I have recently become one of them, I'll walk you through my process!
Remember that everyone does it differently so what works for some may not work for others, it's ok to experiment!
I'm going to make it clear first off that if you're looking to know how to freehand draw the characters, this is not the tutorial for you. My method is far less technical and, to some, probably less authentic. But it works and it's fun and it's easy so here it is!
SPECS
I use the Medibang Paint Pro mobile app to draw. It's available for both Android and iOS. (There's also a PC version but I'm less familiar with it.) A couple years ago, I paid for an expansion that lets you group layers and download brushes and idk if that's still behind a paywall or not, but those are things I can do.
Also worth noting is that I draw on a 4k canvas (3840x2160 pixels). It makes it easier to get little details in higher quality on any given drawing.
SKETCH AND REFS
ALRIGHT ON TO THE DRAWING
I'm using a fake screencap I've already finished for demonstration. I've cropped it down to just Chris because there's some PFJ plot tied to this image that I'm not going to allude to just yet 😉

Looks pretty accurate, right? The reason is because this image was actually drawn based on a bunch of screencap references from episodes of the show.
I downloaded the broad majority of these from @calliecat93's screencap compilations. As you can see, I have some biases. (not me subtly pushing the martiva agenda in the middle of a drawing tutorial 🤣)
I used about seven different images of Chris to make this one, but this is the base image against the main sketch:
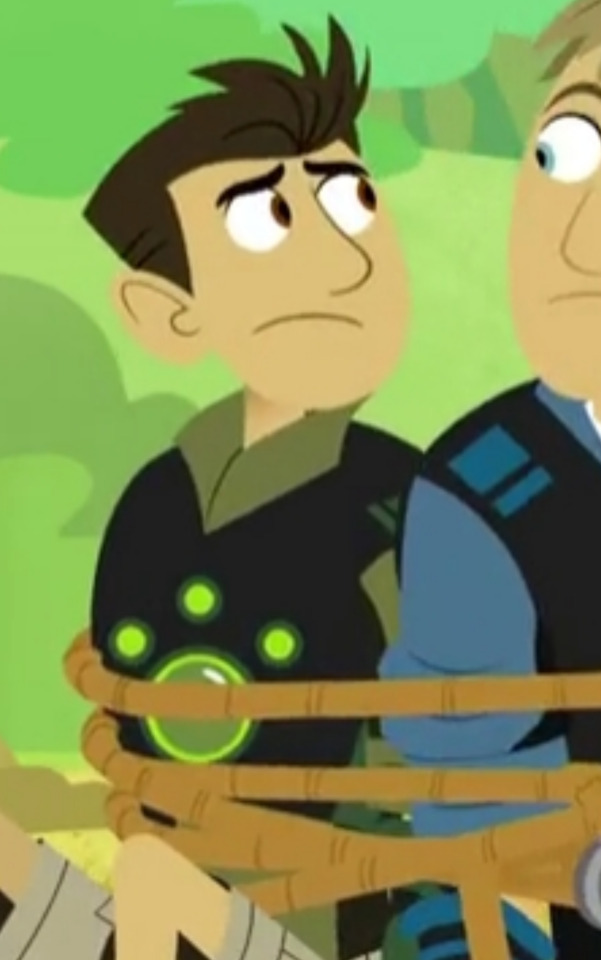
As you can see, it matches how I wanted it to look so this is how it starts. But the position of his head is completely wrong so we need to fix that.

This is what happened when I slapped all the references on top of each other, I had refs meant individually for his head, his eyebrows, and the part of his arm that's blocked in the base image.
So basically I take all these images and Frankenstein them together until they look like what I want. Sometimes cropping, sometimes selecting and literally bending images at the joints to a point that works. Whatever gets it to look like what it needs to.
THE DRAWING
The first thing I do is trace all the lines in bright red. This way, when we go back to color them, it's easier to see where we've been and what we need to cover. Lines stick out in a lineless style and if they're disorganized it can look even worse.
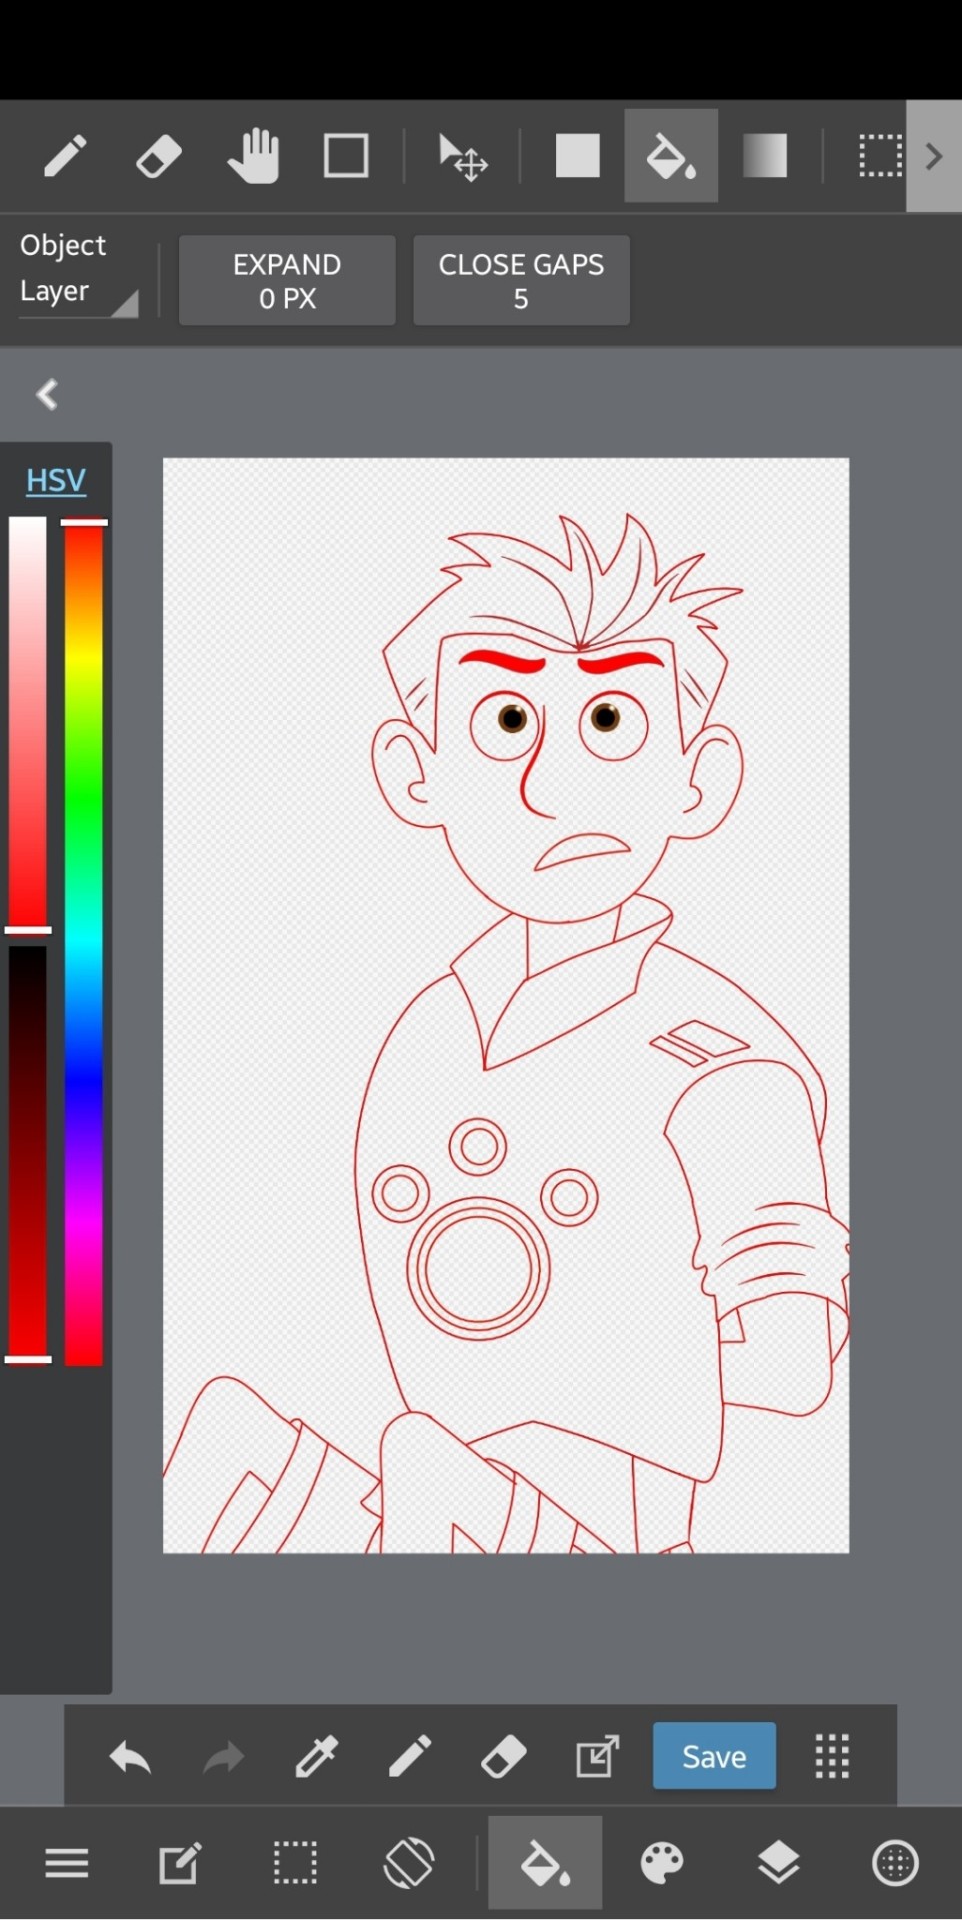
(I've moved the drawing out of line from the refs since I made this, but note that this was drawn with the refs showing underneath to keep the lines clean and on track.)
IMPORTANT: I always make sure to keep like-colored lines on the same layer and separate them out. So it would be like, the head layer, the hair layer, the inner details of each, eyeballs, pupils, neck, and body. Groups of lines that are gonna be the same color when you go back over the image.
The neck layer in particular is important to keep separate because of the show's use of gradient to highlight the separation on most of the characters. We'll cover that in a bit.
I make sure to pay attention to line thickness on the detail layers so it looks as accurate as possible.
After you're done with the lines, we can move on to coloring!
COLOR
The first thing I do is make a new layer to put all the flat color on. How you select and actually color in the lines is up to you, but I keep a separate reference open to pull the colors from to keep the colors consistent. This is usually the same image every time.
Flat color comes BEFORE coloring the lines because you'll use the color you fill it in with to go over the lines to ensure an accurate color match.
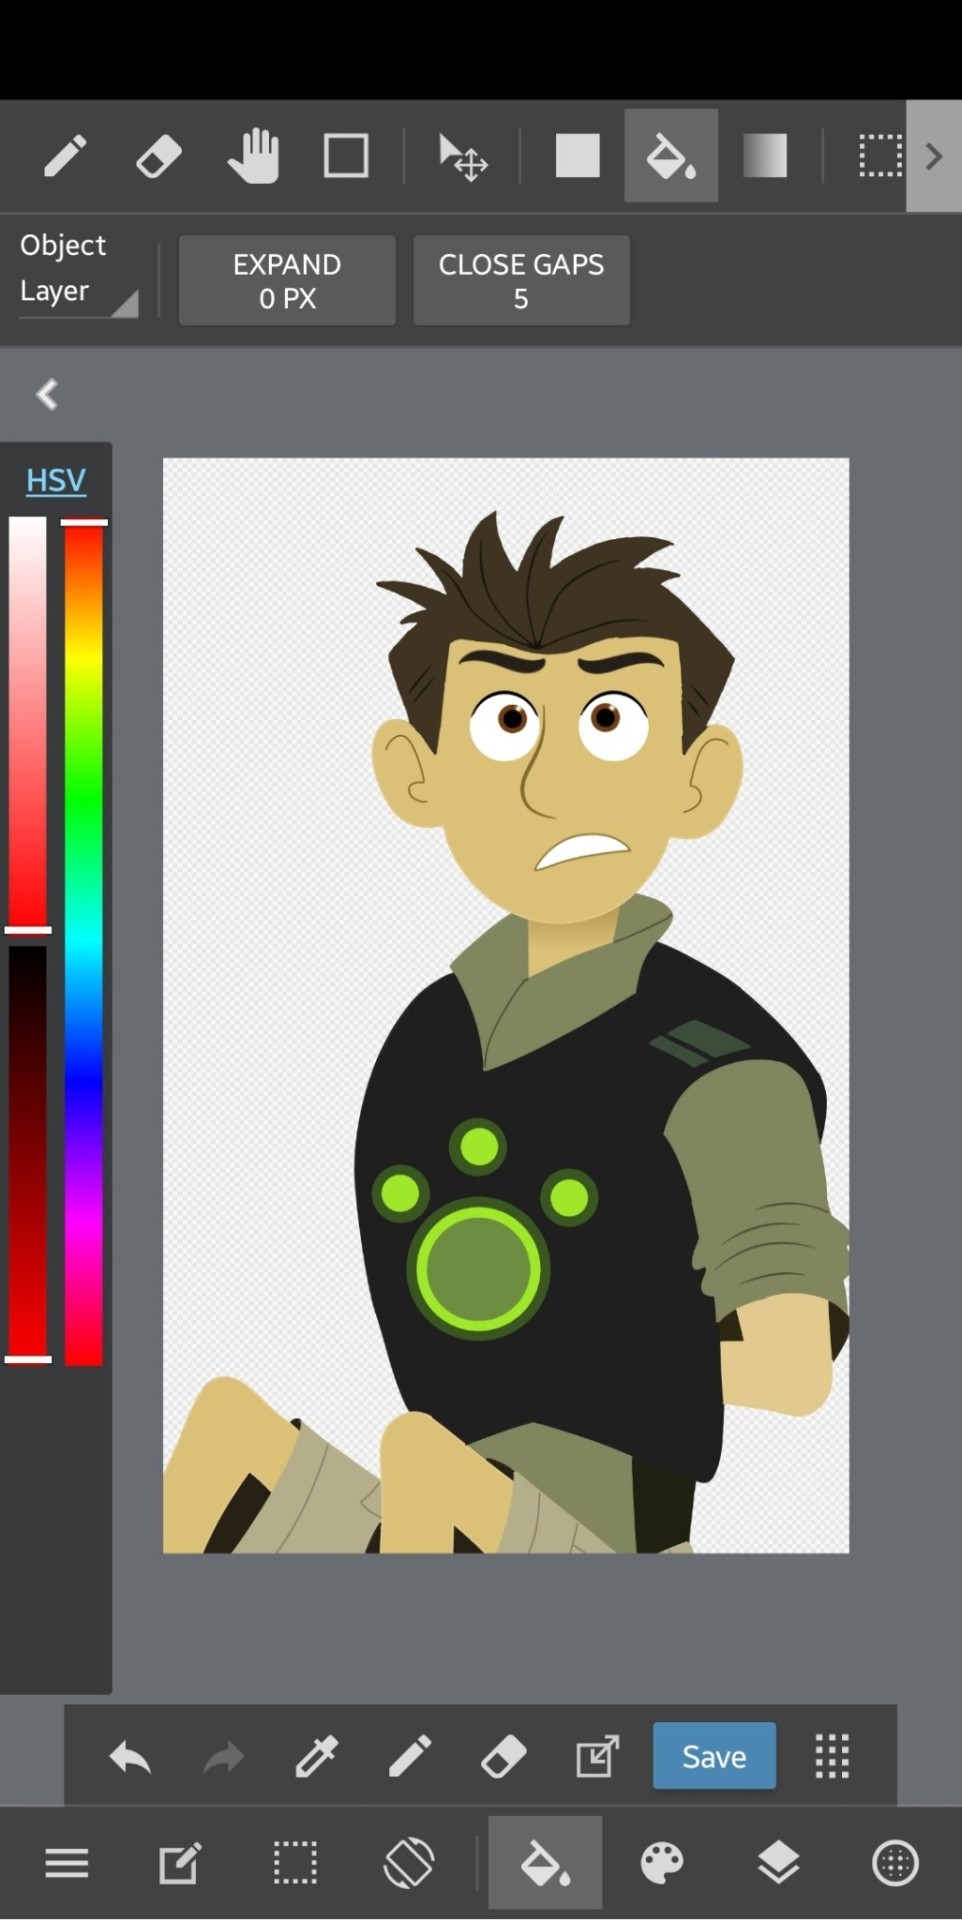
But this is what he looks like with just the flat color. The lines have been colored in now but I can explain that.
Up above your layers, you can turn on certain setting for the one you're selected on. "Protect Alpha" is a setting that will make it so you can only draw in places where you've drawn previously, making it easy to slap down the color for the lines without too much hassle. And when you put everything on separate layers, you don't need to worry about overlap and recoloring in certain places.
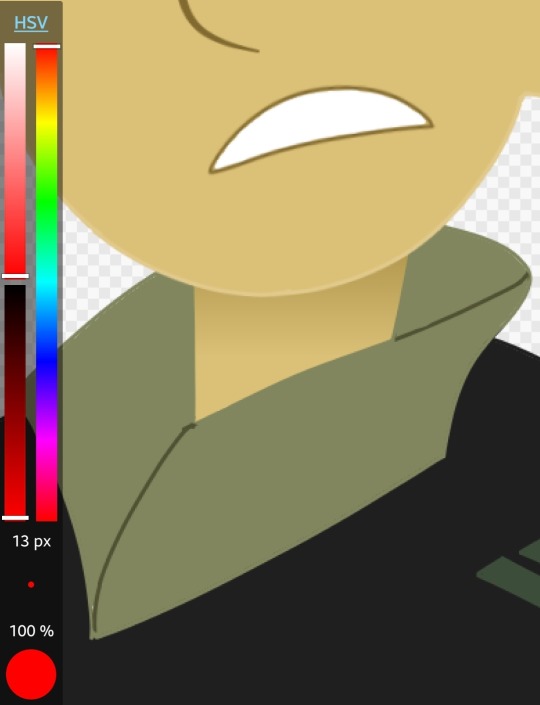
And this is where I'll mention his neck. The gradient effect is best achieved if you put down the entire neck, completely colored, and then add another layer for the gradient and use the "Clipping" feature to make the gradient only appear on the neck. In this case, I just selected the part I would need to put a gradient on and did it without the clipping, but it still looks the same so it's not a big deal.
The final step is to add the background and lighting!
Background and Lighting
Lighting is my favorite part of any drawing because there are so many layer blending filters to play around with.
This is what the background looks like. Simple and to the point and also referenced from an episode.
Play around with lighting however you want! it's all up to you and it can change the entire tone and context of a scene
So this is what it looks like after all the lighting and foreground elements are added! Looks like it's right out of the show! And now that you're able to duplicate this chad of an art style, you too can bend reality to your will--
This was a pretty rushed explanation of what I do, so if you have a question, I'll be more than happy to answer it!
#wild kratts#chris kratt#drawing tutorial#jmoneydraws#i think the drawing i'm using here is the first one i ever did#using the method i'm describing#so what i'm saying and what the images say might not line up but the process is still in its infancy#maybe one day i'll upgrade to freehand but that day is not today 🙃
67 notes
·
View notes
Text
How I Torrent
Hi everyone! A few people have asked me how I torrent movies to make my gifs, so here’s a simple tutorial. A huge thank you to @singinprincess for helping me out when I first started, I couldn’t have done it without you!
Step 1: Download uTorrent. There’s a web version as well, but I use the actual program.
Step 2: Always use a VPN. I use hola! which is a good one.
Step 3: There are lots of torrent sites out there, but the only one I use (and trust) is 1337x.to. Once you’re on that site, just search for whichever movie you want. My suggestion is always go for 1080p instead of 720p because it’s usually better quality. 720p isn’t bad but I prefer the best of the best. If it says bluray, even better! Let’s use my favorite movie Baahubali 2 as an example:
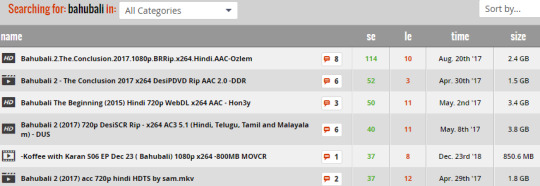
Step 4: Here, you see a bunch of results. Always go for the one with the most seeders (se) and leechers (le)!!! They usually download much faster. Also make sure to double check the file size. You definitely don’t want to be downloading something that’s 17 GB.
Here’s a good explanation by WikiHow: Download a well-populated torrent. The speed at which you can download a torrent file is determined by the number of seeders available. A seeder is a torrent user that has the entire file available for downloading. Most torrent sites allow you to sort search results by the number of seeders. Look for files with a large number of seeders. Not only will you download it faster, but it is less likely that the file is fake or infected with a virus. The number of leechers will affect your download speed as well. A leecher is a user that is downloading, but is not currently seeding. A leecher becomes a seeder when the full file has been downloaded. If there are significantly more leechers than seeders, the amount of bandwidth you receive will be lower, resulting in slower downloads.
Step 5: Click on whichever link you want to download from. Next, you’ll see this:
I just click on the first option. It will automatically download the .torrent file to your computer.
Step 6: Open up the uTorrent program and click File > Add Torrent. Select the .torrent file from your computer. A box will pop up showing the contents of the torrent. Sometimes subtitles, screencaps, uploader notes, and samples are included. Unselect what you don’t want and make sure only the movie (and subs) are checked.
Step 7: The file will start downloading. Again, the more people that are connected, the faster your movie will download. You’ll find this on the bottom right hand corner:

Because the numbers look good, my download status looks like this:

ETA 35m. Not bad at all!
Step 8: Once your file is finished downloading, it will start seeding. This means you are uploading the data for other people to download the movie as well. Of course you don’t have to, but it’s always nice to do so! Please seed your torrents, people!!! Also, you are free to delete the .torrent file after this.
TIPS:
Don’t attempt to play the movie before it finishes downloading, otherwise it won’t work!
Make sure you have your antivirus up to date so you don’t accidentally download a virus.
Sometimes there won’t be any peers connected and you won’t get an ETA. Don’t be discouraged, just leave the torrent alone and the download will finish eventually. The program will continue running in the background.
If you try to download a file with low seeders/leechers, sometimes it’ll get stuck and won’t finish. That’s why I suggest downloading a well-populated one.
The process might seem a bit intimidating at first but I promise you, it's pretty simple once you get the hang of it. I hope this tutorial helped!
22 notes
·
View notes
Text
TWEWY 01

AAAAAAAAAAAAAAAAAHHHHHHHHHH!!!!!!!!!! IT’S HERE!!!!!!
Oh my god... I’m not dreaming, right? This feels like a dream. It’s really here. TWEWY is really an anime now. Holy crap I still can’t believe it. I’ve seen the announcements last year and the trailers but actually watching episode 1 and seeing parts of the game animated is another thing entirely.
There’d be spoilers below since I’ve played the game and am gonna be fangirling my heart out.

I’m sorry but it’s JOSHUA!!! They showed Josh in the background early like they did in the game. I was about to scream when I saw him! I did actually... as silently as I could since it’s like, 3:30 am when I watched this and everyone is sleeping. My brother still heard me and told me to keep quiet lol.

Oh my god... they did the pact and did battle and it was awesome! The noise being 3D-ish is perfect! I was trying to lower the volume of my voice when I was almost screaming and clapping when I heard freaking “Calling�� playing as BGM. I felt chills from how happy I was. I was so out of it and couldn’t concentrate at the beginning cause it still felt like a dream that this is real.

Seeing all the characters I know from the game is just so cool! Also, they showed the logo of the areas they get into like they do in the game!

The gang finally meets!!! Their talks about how the game works since Neku lost his memories felt like I was hearing a tutorial lol. It’s so good though.

This scene... I remember it from the game. When Kariya and Uzuki was wondering who Mr. H was I was smiling and thinking “I already know the answer.” hahaha
--
Some other thoughts: I’m wondering if they’re gonna use “Calling” as a replacement OP since they had to cancel using the one they were planning to use due to irl issues. If so, I don’t mind. “Calling” is one of my favorite songs in the game and hearing it playing just reinforces the reality of this in my brain.
Another thing, they already went through Days 1-3 on episode 1 alone. It’s fast (faster since we’re not the ones controlling the characters cause I would’ve tried to grind before finishing a day lol) but I guess they’re gonna try to get to the interesting parts of Week 1 and Shiki’s backstory. I still don’t know how many episode this will have but hopefully they do it well. I can’t wait for Week 2 and Joshua! (It’s his week I kept replaying when chapter selecting was available after clearing the main game)
This still feels unreal. I was cheering and clapping earlier when watching episode 1. I was so excited when I saw Ani-One (a channel on youtube that could legally post episodes of anime) post this and it was like a miracle. Here I was thinking I’d have to use an illegal site (which, while not exactly something I’ve never done, is a pain since the sites load terribly) to see this anime.
I played TWEWY years ago. I don’t exactly remember what year but it was way after the game was released (I think I played it on emulator on 2013). My brother played it first and I decided to try later after he finished so that I don’t bother his playthrough. It was easier for me since he already cleared it lol. I loved the game, the characters, and the story so much. I always imagined what it would be like if it ever got an anime adaptation, what the art would look like, and how they’d adapt each week. I’ve seen other people try making fake anime screencaps of what they think the show would look like. An anime version of TWEWY is something I’ve been waiting for in a long time and no doubt the people who played and loved the game years before have waited longer. I’m glad it’s here now.
I don’t know if I’d be posting weekly stuff about this or will wait til a game week is over or if I’d just do an overall. I guess I’ll figure it out as the episodes go along. I dunno if you got this far but thanks for reading and I hope you enjoy watching TWEWY if you’re watching it, too.
3 notes
·
View notes
Text
So you wanna be a king (pt3)
or maybe you just wanna cosplay one.
Continuing the cosplay semi-tutorial-semi-rambling for those who love one smol bean and wish to dress as him for funsies:
Part 3: Trousers and Boots
Okay, so, at this point you’ve probably spent at least $150, and at least enough hours to watch every Game Grumps King’s Quest LP (that's three and a quarter full games) three times. Likely more.
It’s time to pull out your screencaps again, to remind yourself why we’re here.
(it’s for this cute face, with all his determination and compassion and bravery and intelligence. That’s why.)
You’ve got a jerkin (pt 2) and a cloak (pt 1) but it’s indecent to walk around without anything waist down, so let’s a’stitch some trousers. And also some boots while we’re at it.
Trousers!
When I was at the Renfest, someone asked me where I got my neat blue riding pants. Well, for starters......they’re yoga pants. And also, Goodwill. Have you noticed a trend with me yet.
This knobbly-kneed lad is definitely not pulling a Men In Tights routine--there’s too much definition and stiffness in the wrinkles. I decided on sweatpants, though, because why not? May as well be comfy. (The more accurate fabric choice would probably be like, a khaki material, but, nah). I selected two separate pairs in the colors I wanted.
Because this costume isn’t warm enough, I attached the lighter pair over the darker rather than Frankenstein-sew two chopped parts together. It’s kind of like wearing pants and a half. Because I’m the monster. And also I was concerned that long-term wear would weaken the stitching if I pulled a Frankenstein, and this costume has been time consuming enough without risking it falling apart on me.
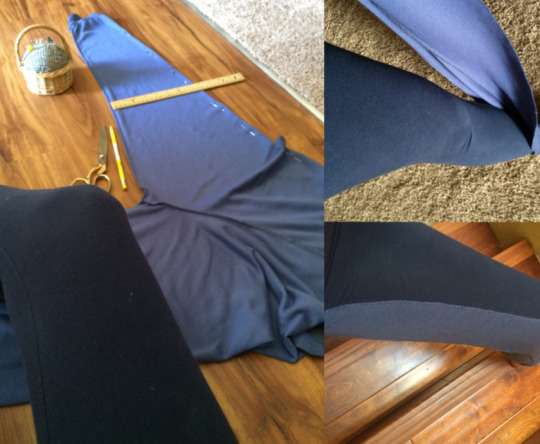
What that means is this: I put on the darker pair, measured about how wide it looked Graham’s pants were vs on me, turned the lighter pair inside out so I could mark the width on them, and cut out a long and bizarre looking rectangle from the inner section of the light pair.
The reason why we cosplay is to get into our favorite character’s pant--no, I’m sorry, the joke’s too bad, I’ll see myself out.

I selected three inches wide on either side of the inner pant hem, so six inches wide in total, from ankle to ankle. This does mean there’s more fabric around the ankle since they naturally slim down, but the boot covers that. Since the lighter pair had an elastic stretchy cuff, I left that intact so the pants wouldn’t bunch up when walking.
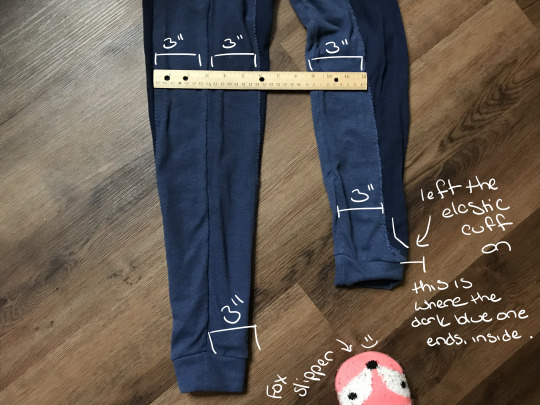
Immediately after cutting out the light pair, I ran it through my sewing machine with that herringbone stitch (the zigzag triangles) to “seal” the fabric edge and prevent fraying. It gives it kind of a bubbly textured look if you look closely, but if you’re not about that life, you could cut out an extra inch and hem it back for a straight clean line.
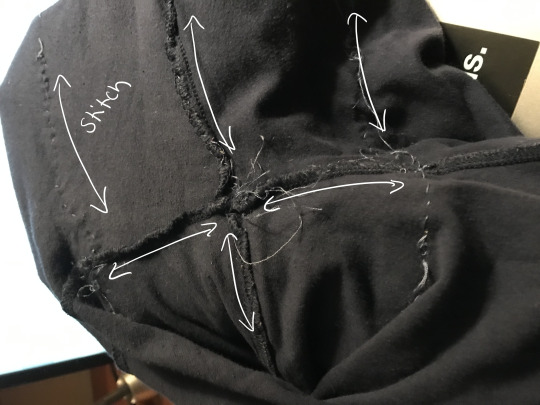
I then carefully lined up all the hemlines, light to dark, pinning as flat and evenly as possible. Then, hand sewing. Bane of my novice cosplay life.

First I stitched hemline to hemline so it would be precisely centered, then again along the edges of the light fabric. So I sewed this thing by hand three times, paying special attention to the area where the legs intersect since that’s where the most friction from walking and picking up inventory items and the like will wear. Just sew along existing hemlines. It can be sloppy; no one will ever see your stitches--unless you turn it inside out to make a semi-tutorial for strangers on the internet, and then they’ll laugh at you.
If you feel fancy, you can add the thick patches on Graham’s trousers. I didn’t bother at the time because it felt like a bit much, but I do really like those patches. Maybe someday.

Also, you should probably handwash this piece too. Unless you trust your sloppy stitches more than I trust mine.
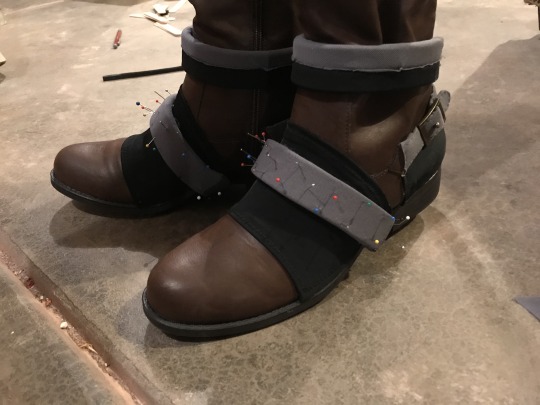
Boots!
I’ma tell you a secret: my absolute favorite part of all of Graham’s outfit is the boots. I love them. I want a real pair. Like, with actual metal bits, not cheap eBay boots and shoe goo and hope. The boots are at least a quarter of the reason why I made this costume in the first place.
And yet, the boots were the last thing I made, more than a year after completing the rest of the costume. I wore shin-high lace up boots in the meantime, and it was fine, but knee length is truly the ideal silhouette against your cloak. It does make a difference.

I’ve made boot covers before (Lynne, Ghost Trick, bright red), and it’s fine, but it’s also frustrating. I highkey recommend just modifying a regular boot. There are lots of gorgeous, expensive options out there, but in the end I settled for a bootleg boot from China (you know, the ones that are “fashion” but which all use the same stock image and are fake mimics for a fraction of the cost on eBay) for a grand total of...$25.00, with shipping. Ye boi.

According to the receipt this boot is an.....”American Rag Ada Round Toe Synthetic Over the Knee Boot.” Cool, deffo bootleg.
Another secret: I put gel inserts in both the toe and the heel, I wear gel-ankle socks over my regular socks, and I stuff the heels with leftover plushie-making cotton fluff. Because bootleg boots are cheap and blistery, and comic con floors are hard enough even with a nice sturdy pair of shoes, so seek every advantage you can. More cotton fluff. More! Stuff it in there! And also wear your favorite patterned socks, because it’s my tutorial and I said so.
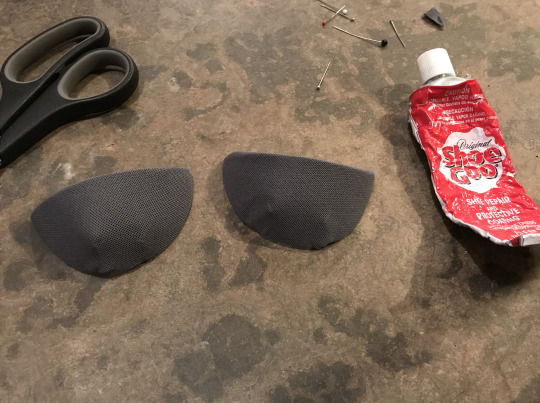
Okay, back to the store. Get the following things: a small amount of stretchy black fabric, a small amount of gray fabric, a sheet or two of craft foam, a tube of shoe goo, and popsicle sticks or some other way to “paint” the goo. Also an audiobook to help pass the time. (can you believe no one’s recorded the King’s Quest novels into an audiobook form, how tragic.)
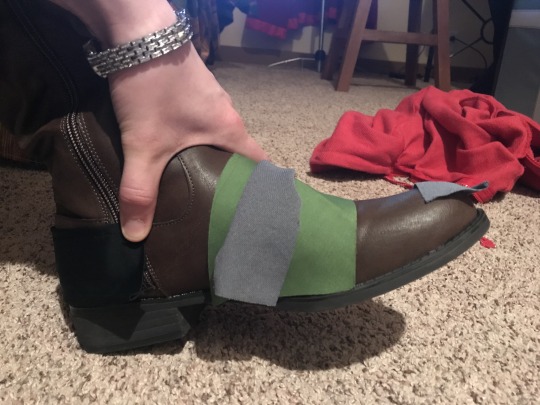
Using some of the boundless scrap you have from the rest of this cosplay, determine how wide you want the black pieces to be, and maybe the gray while you’re at it. That fully depends on your boot.
Cut out your black for the front and back pieces. They won’t be pure rectangles, but have a trapezoid curve to them to mimic the shoe curve. Pin and hem.
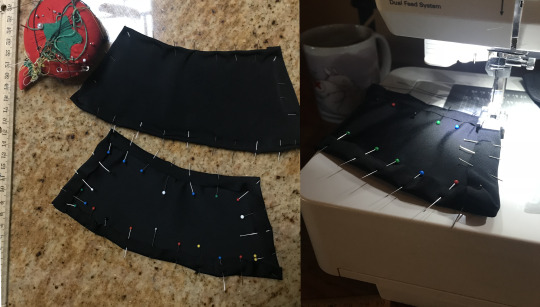
Apply shoe goo around the whole section of the boot you’re covering, as flat and even as possible, and stretch, apply, and pin your black fabric into place. Do little detail work with the popsicle sticks, and once it’s all pinned, leave to dry for a while. Ideally, overnight, so the glue can set.
Go play King’s Quest again or something while you’re waiting. It’s not like you have anything else to do, right?
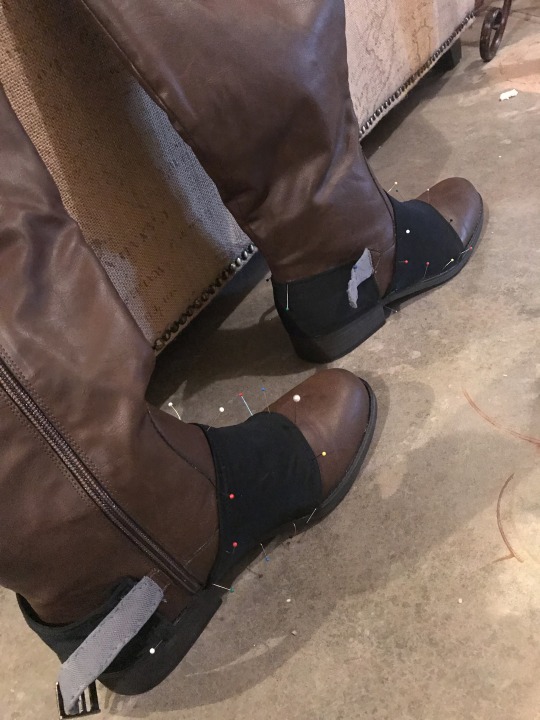
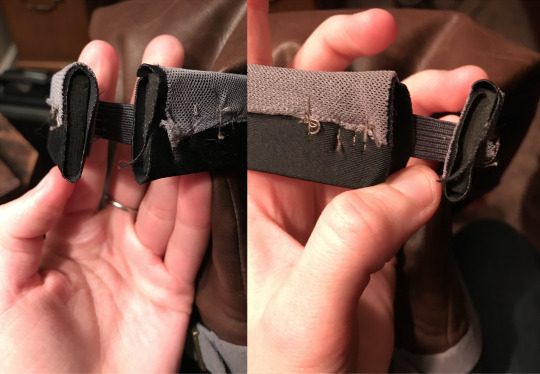
This boot happened to already have a buckle on the back which I wrapped in gray fabric to mimic the silver on Graham’s heels--your boot probably doesn’t have this, so use this following method instead.
To get the silver cuffs, I cut out foam (you might have to look around for foam in a good thickness, or glue multiple sheets together--mine is, uh....the thick foam my bose headphones came in.....), and glued fabric over it. Then I glued the foam/fabric curve to the shoe, pinned it in place, and walked away again. I sure hope you like your audiobook. There’s a lot of downtime here.
This method works for the anklets too. Wrap foam entirely in black fabric. Hilariously, since it’s foam, I didn’t have any trouble pushing it through my sewing machine to add the gray on top of the black. Another secret: my anklets connect via elastic, so I can get the boots on while still having a snug anklet. No, it probably doesn’t look great if you’re walking right behind me, but there’s that 5 foot rule of cosplay that means no one should see it, and who’s staring at my heels anyway, that’s weird.
Cut thin regular plain sheet foam in the right size to fit over your toe. To achieve the curve, cut out little notches (you can just see a discarded notch in the included picture), then glue the edges together again sans notch. Bam, curve. Cover in fabric, glue to the toes of the boots like everything else, pin, and wait until dry (yes, overnight again--I did tell you about the audiobook).
And that’s that! (At least, for me: I have not done the laces on the front, or cut out the knee guard, or anything that requires actual intensive boot modification because I was in a hurry to go meet Christopher Lloyd and on a deadline and forgot to come back to it. No, for reals. Comic cons are magic places.) It’s held up for two full years at cons and renfests and even in a light rain without trouble, tho I do need to touch up some of the edges a bit.
Put the whole thing together: jerkin, cloak, cowl, trousers, boots. You’re looking fiiiine. All the cool cats are jealous of your sweet new kicks.

And with that, all the giant heavy pieces of your cosplay are done! It’s just accessories and details left. And the adventuring cap, one might argue the most important piece of all. But we’ll get there. Probably. As long as this is helping someone.
#King's Quest#kings quest#King Graham#cosplay#okay i admit i'm stalling because i don't remember how i made the hat#i'll get to it maybe#tutorial
25 notes
·
View notes
Note
Funny how the screencaps only show up after everyone has been taught how to convincingly fake them.
I mean rn you just have to look for tutorial on yt and it’s there
So easy
And yet when I need some useful tutorial there are none
3 notes
·
View notes
Note
How did you make the fake screencaps so authentic looking? It's one of the best recreations of vhs noise/saturation I've ever seen they're so delightfully crunchy
Hey hi! So I’m afraid I can’t give as thorough an answer to this as I’d like in the form of an ask, but other people have expressed interest in how I did it so I’ll likely make a tutorial describing my process this month. It’s not exactly hard, just has a buncha steps to it.
But to give a basic rundown, the best ways I’ve found to make VHS screencaps look realistic is:
1) Draw in a style reminiscent of the time period you’re emulating. There’s nothing wrong with having your own style be influenced by modern cartooning and animation, but to be frank Steven Universe and The Aristocats look completely different, and both are very much products of their times. Leaning into a 90s aesthetic will help you along greatly. Referencing backgrounds from 2D films of yesteryear also helps you literally set the stage (e.g. I referenced The Land Before Time, Spirit, Bambi, and more while painting my backgrounds.)
2) Don’t rely on cheap tricks like scanlines and noise to portray glitchiness or low quality. This is an idea we’ve internalized and cannibalized from each other in an effort to mimic Ye Olde Vee Atch Esses, but it’s not realistic. Most distortions on film, as you stated, are those that affect color. “Noise” itself is more about the loss of clarity then garbled blotches you add in Photoshop. For instance, here’s an actual screencap from a Lion King VHS tape vs a cap from the same film on DVD/Bluray:


The main distortion here isn’t wacky scanlines or big chunks of noise, it’s the loss of detail and the oversaturation/blowing out of colors. And it’s still very apparent that the VHS one came from ‘94 and the DVD one came from the 2000s. VHS tapes don’t become pixelly, and not all of them need scanlines to seal the deal. You can achieve just as much with simpler means.
3) This is the most important one, you CANNOT be afraid of losing detail. It’s inevitable. It WILL happen. Even the most perfectly preserved VHS tapes don’t display crisp 1080p imagery. So you gotta be willing to wreck your own shit. Blur liberally. Distort colors and edges. Use filters that sap detail away. Save exclusively as .jpeg. There are particular ways I do this that I’ll share later, but so long as you’re willing to sacrifice quality, you’re already halfway there and practice will help you find your own method. Remember, you can always upload the HD version later if you want to! Just be sure to save it while it’s still pretty lol.
And that’s it! I hope this has been ever so slightly enlightening.
168 notes
·
View notes